

A picture can be worth a thousand words, but just like words, some editing is required to turn your raw experiences into beautiful memories. How many times have you come back from a holiday only to find that your photos donʼt quite convey the brilliance or emotions you remember seeing in person? We speak to photographer Triston Yeo for some of his top hacks to achieve photos worth remembering with the help of Adobeʼs suite of editing tools.


A picture can be worth a thousand words, but just like words, some editing is required to turn your raw experiences into beautiful memories. How many times have you come back from a holiday only to find that your photos donʼt quite convey the brilliance or emotions you remember seeing in person? We speak to photographer Triston Yeo for some of his top hacks to achieve photos worth remembering with the help of Adobeʼs suite of editing tools.

HACK #1: MAKING SKIES A DEEPER BLUE
Ever tried taking photographs of flowers against deep blue afternoon sky? Expose for the flowers and you get an overexposed sky, but expose for the sky and you get severely underexposed flowers.
Triston encountered just such an instance in Kyoto when he was trying to get images of the lovely Sakura flower. He chose to expose for the flowers to also retain the textures of the clouds in the sky. What he did next, was to import the image into Lightroom, then go to the Hue/ Saturation/Luminance (HSL) panel and select the Luminance panel. By lowering the luminance of the blue channel, he turned the sky deep blue while not affecting the exposure of the flowers as these did not belong to the blue channel.

HACK #2: BRINGING OUT THE BRILLIANCE OF SUNSET AS OUR EYES SEE IT
With this image, Triston was on a short getaway with his wife at Krabi, Thailand.
They decided to take a stroll along the Ao Nang beach during sunset and Triston took a picture of his wife as she took off on a short jog. Can you see her jogging in the foreground?
Normally, we would expose for the sky to preserve the highlights, leaving the foreground severely underexposed. The dynamic range of the scene is simply too great for the camera to capture in a single exposure, so Triston’s first step in Lightroom was to lower the Highlights and increase Shadow details in the Basic panel.
Next, he targeted the dark region in the tone curves panel and push the curve upwards slightly. This helps to bring out some of the details hidden in the foreground, like the silhouette of his wife and the sandy beach.
After that, he utilized one of his favorite tools in Lightroom - the Graduated Filter – to bring out more tonality in the sky, the sea and the beach. Triston added a richer blue to the sky, more orange to the sunset, and warmer tones to the beach by adjusting the exposure, contrast and the saturation, then letting the Graduated Filter apply these changes across the image.

HACK #3: ADDING INTERESTING TEXTURES TO ENHANCE A SCENE
With this image from Swakopmund, Namibia, Triston recalls how the weather was overcast with the occasional drizzle. There was none of the blue sky with fluffy clouds that he was hoping for, but he still managed to get an image of a yellow-billed kite flying just above him.
The shot was of course severely underexposed as his camera automatically reduced the exposure to compensate for the predominant background of white clouds, but Triston took the image into Lightroom to make a proper picture of it.
First, he used the Radial tool in Lightroom to highlight the kite and increased the shadow details to 97, revealing all the details of the bird’s wingspan. Triston also used the brush tool within the Radial Tool to erase the space outside the bird’s frame so that the effects only applied to the bird itself.
Next, he selected the Aged Photo effect under the Lightroom Color Presets to give it an old-fashioned sepia look. Bringing the image into Photoshop for further editing, Triston then added a new layer and selected Render under the Filter Panel and chose the clouds option. To make the clouds look as if they were in motion, he then applied the Path Blur filter under the Blur Gallery option in the Filter Panel.
Finally, Triston blended the clouds layer with the background layer using the Soft Light effect under Transparency. As there were parts of the clouds that merged with the bird’s body, Triston also applied a vector mask onto the clouds layer, allowing him to mask out the clouds on the bird’s body.

HACK #4: CREATING A HIGH DYNAMIC RANGE (HDR) PHOTO
To capture the scene you see before you, Tristan said he waited for 1.5 hours; staying near an Italian café just so he wouldn’t miss the timing for his shot. His camera was mounted on a sturdy tripod and he used 10X Neutral Density filter to take a long exposure, giving that dreamy feel of the water.
In total, he shot about seven different exposures, with one stop difference in each exposure. He finally used only three – with priority given to the sky, the water and the beach in the foreground. With these three exposures selected in Lightroom, Triston right-clicked to get the Photo Merge menu, and selected HDR.
Next, he applied the Graduated Filter Tool to bring out the shadow detail of the pebbles on the beach. Note that he aligned this filter according to the angle of the beach, and also used the same tool to bring up the saturation of the sky and the sunset.

HACK #5: PAINTING FOR THE BEST BLACK & WHITE IMAGERY
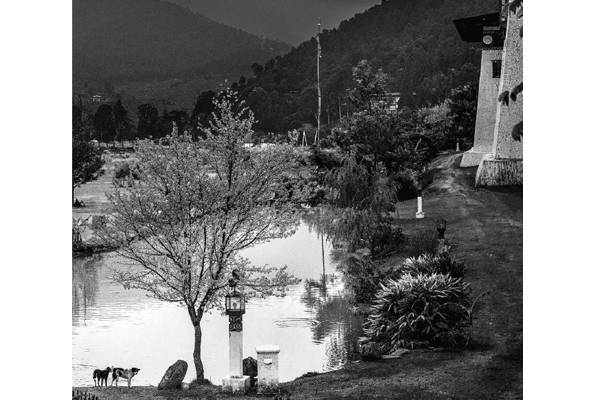
Triston says it was an overcast day when he went to photograph this pond next to the Punakha Dzong in Bhutan, and the colors were muted all around. However, he noticed there were several layers of details in the scene that would make for a perfect black and white artistic shot.
Thus, he converted the image to a Black & White one in Lightroom and adjusted the different color channels to bring out the best details in each of the zones. Next, he applied the Radial Filter to various parts of the image to bring out the shadow details in each of the areas, using the brush erase tool to fine tune his changes by erasing some of the Radial Filter out.
After that, Triston brought the edited image into Photoshop and applied the Content Aware Fill to remove the people on the right hand side of the photo, keeping the viewers’ attention on the subjects in the middle of the photo.
Triston’s final step is what traditional Black and White photographers used to do in the darkroom – he manually dodges and burns various portions of the image to enhance the highlights or darken shadowed areas selectively.


