

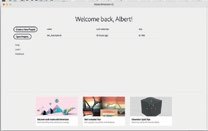
Adobe Dimension CC makes it easy for graphic designers to create highquality, photorealistic still images that include virtual 3D objects. Albert shows us how to use it to easily build product shots and scene visualizations.


Adobe Dimension CC makes it easy for graphic designers to create highquality, photorealistic still images that include virtual 3D objects. Albert shows us how to use it to easily build product shots and scene visualizations.
In this example, Albert shows us how to create an advertisement for a vehicle breakdown service. After starting Adobe Dimension, click on the Create A New Project button in the Start Screen to create a new Dimension project from scratch.
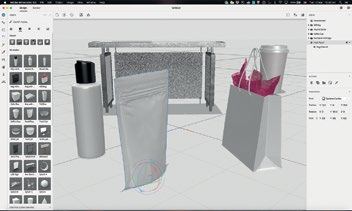
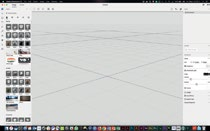
1 This opens up the Adobe Dimension user interface (UI) with an empty scene in the middle and three key sections: (i) a navigation bar; (ii) an Assets panel; (iii) a Scene properties panel.
1. Establish the background image
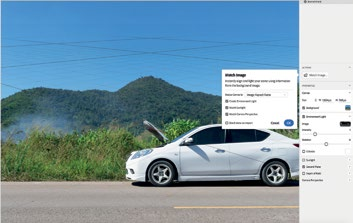
2 For this example, Albert used a background image licensed from Adobe Stock. To search for, license and download an Adobe Stock image directly from Adobe Dimension, scroll to the bottom of the Assets panel and click on the link Browse Adobe Stock, opening the Adobe Stock webpage.
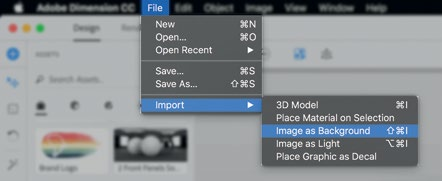
To import one of your own images into Adobe Dimension, go to File -> Import -> Image as Background and browse to the folder where the image is stored. You can also drag and drop an image directly into the scene view.

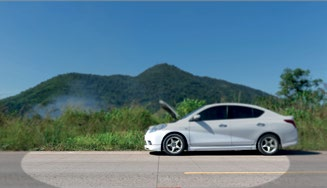
3 This brings up the Match Image dialog box that asks you how you wish to resize the canvas, and whether you wish to create environment light, match sunlight and match camera perspective. In this case, Albert usually selects Resize Canvas to Image Aspect Ratio and checks all three options.
4 If tweaks are required, tap on:
-> the 1 key, then click-drag anywhere in the scene panel to pan the camera left / right or tilt the camera up / down
-> the 2 key, then click-drag anywhere in the scene panel to dolly the camera left / right or up / down
-> the 3 key, then click-drag anywhere in the scene panel to zoom the camera inwards / outwards
2. Add the 3D model
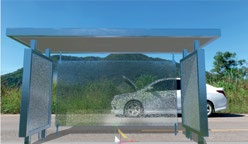
5 In this example, Albert is using a free 3D Model from the Assets panel called Bus Stop with Sign. Find your own by clicking the Models icon near the top of the Assets panel to display a list of 3D Model thumbnails. To import any 3D Model into your scene, simply click on its thumbnail.
Tap on the S key (shortcut for Scale) with the model selected to reveal the Scale handle. To scale the model proportionately, simply click-drag right to left on the white triangle at the center of the handle.
6 You might also need to reposition the 3D model. Tap on the V key (shortcut for Select & Move) to reveal the Move handles and click-drag to move the 3D model to the appropriate location. 7
3. Add signage art as decals on different parts of the 3D model
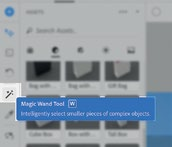
Next, we’ll apply signage art to various parts of the 3D model. To select smaller pieces of complex 3D models (as opposed to the entire 3D model), tap W to activate the Magic Wand tool and click on specific areas of the 3D model to select them.
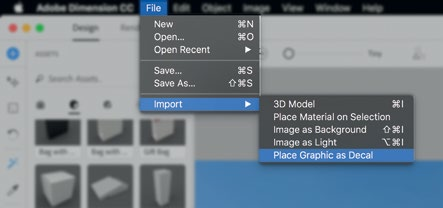
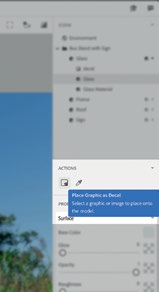
8 In this example, Albert used the Magic Wand tool to select the backboard piece of the 3D bus-stop model (the one facing the camera), then went to File -> Import -> Place Graphic as Decal to select his chosen signage art.
9 Once imported, placement handles appear that you can use to position, rotate and scale the decal art on the surface of the piece.10
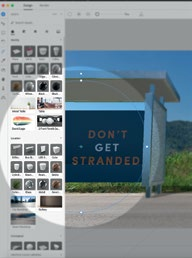
Once imported (and automatically applied onto the selected piece of the 3D model), placement handles appear that you can use to position, rotate and scale the decal art on the surface of the piece.
To place a different decal art on the sideboard piece of the 3D busstop model (the one facing the car), you need to first assign a different material to that piece. This is because the material assigned to it (Glass Material) is the same as that assigned to the backboard piece, and that already has the art decal applied from the earlier step.

With the sideboard piece selected using the Magic Wand tool, click on the Materials icon in the Asset panel to display a list of all available materials available. Then select the desired material by clicking on its thumbnail, in this case, the Glass icon. 11
A new material with the same name, in this case “Glass”, will be created in the Scene panel on the right. Select the new material, go to the Actions sub-panel and click on the Place Graphic as Decal icon (or go to File -> Import -> Place Graphic as Decal). 12 This brings up the Folder window through which you can search for the decal art from your local drive. Thereafter, repeat the previous steps to position, rotate and scale the decal art on the sideboard piece. 13
4. Adjust the environment lighting to match the background image
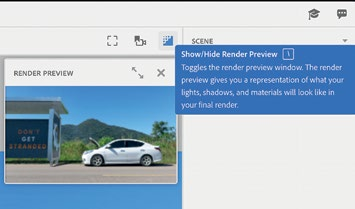
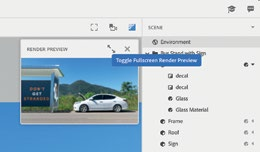
To see a preview of the rendered image at this stage, click on the Show/ Hide Render Preview icon on the top-right corner of the scene view.
14 To see a preview of the rendered image at this stage, click on the Show/ Hide Render Preview icon on the top-right corner of the scene view. This brings up a thumbnail-sized (about 10% of the scene view area) render preview window that updates whenever a setting is changed.
To add a sense of realism to the image, select Environment under the Scene panel. This opens up a list of different sub-panels and options under the Properties panel. To tweak lighting and render properties, ensure the sub-panels Environment Light and Sunlight are checked and opened.15
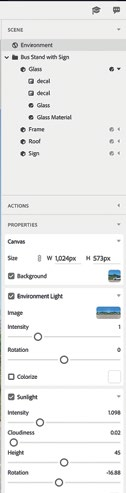
Focus on adjusting the properties under the Sunlight sub-panel. The goal is to match the darkness, direction, length and sharpness of the 3D bus-stop model’s shadow to that of the car from the imported image. Adjust the following properties in the Sunlight sub-panel to get the following respective results:
-> Intensity – Darkness of the rendered shadow
-> Cloudiness – Sharpness of the rendered shadow
-> Height – Length of the rendered shadow
-> Rotation – Direction of the rendered shadow
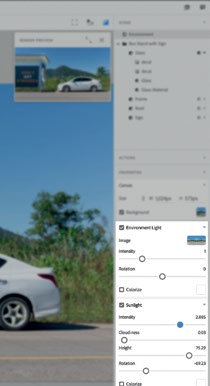
16 We can repeat this process with the properties under the Environment Light sub-panel, which adjusts the lighting of the 3D model itself. This may not be necessary as Adobe Dimension generally does a decent job of matching the environment lighting with that of a background image when it is imported.
To see a larger render preview of the adjusted image, click on the Toggle Fullscreen Render Preview icon located within the thumbnailsized render preview window. Clicking on this icon once again will return the render preview window to thumbnailsize. 17
5. Render the composite image
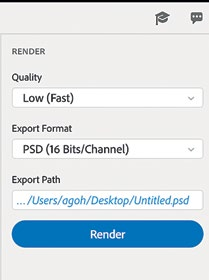
The last step in this process is to render a nal composite image. Switch to render mode by clicking on Render at the top-left corner of the screen. 18
The options here are all located on the Render panel on the right and are fairly straightforward:
-> Quality – select from Low (Fast), Medium or High (Slow)
-> Export Format – select from Photoshop PSD (16-bit), PSD (32- bit) or PNG
-> Export Path – click to set where you would like to save the rendered image
If you render the image in PSD format, you may open it in Photoshop to do further adjustments. Each 3D object will appear as a separate Photoshop layer from the background image.
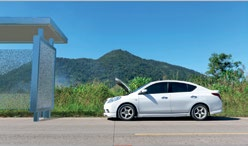
19 – Final Rendered Image
Images by Albert Goh, Adobe Solution Consultant Edited by Marcus Wong


