

Jeryl Tan’s (@smilewithjeryl) fascination with long exposure is that it captures a fast-forwarded image in a single frame, creating another perspective in which to view our ordinary world. Jeryl says that’s how he views the world too, and that he thoroughly enjoys showcasing unique perspectives in otherwise-everyday scenes. Photography by Jeryl Tan Edited by Marcus Wong


Jeryl Tan’s (@smilewithjeryl) fascination with long exposure is that it captures a fast-forwarded image in a single frame, creating another perspective in which to view our ordinary world. Jeryl says that’s how he views the world too, and that he thoroughly enjoys showcasing unique perspectives in otherwise-everyday scenes.

Before beginning to explain his tips and tricks, Jeryl wanted to especially emphasize the importance of shooting all images in RAW format. Because long exposure photography usually occurs from evening to night, or in places with little amount of light, Jeryl says this will help you retain more information which then allows for a greater range of edits in post processing so you can better bring out the details or colors of your image.
Now, on to the tips proper!


1 KNOW THE RIGHT SETTINGS
Different times of day and different situations require adjustment of your camera settings. You need to be aware and sensitive to the changes in your frame to make the necessary changes. Many times, long exposure shots turn out either overexposed or underexposed, so you lose crucial details in the image.
Personally, there are two key settings that Jeryl keeps constant whenever he takes long exposure shots. These are the ISO and the aperture. Firstly, he sets his ISO to the camera’s optimum quality (usually at ISO 100 or 200). Then, depending on the subject matter for the shot, he keeps aperture at f/8 or f/9 to ensure that all the details within the frame is in focus. Anything more or lesser than that tends to result in the loss of certain details which might not be visible to the naked eye, unless zoomed in on screen later.
The last setting to take note of is shutter speed. The longer the shutter speed, the longer the shutter stays open and thus the greater the amount of light that enters the sensor. In some cases, this results in overexposed images. One way of ensuring that the image is not overexposed, is to look at the Exposure Value (EV) meter on the camera after setting the shutter speed. If you are taking a long exposure shot of the cityscape, having the EV meter read just slightly below zero will enable you to retain the city’s details while not overexposing the city lights, which may get overexposed if it’s above zero.
When you get exposure right, there is usually little adjustment required. The details of the image are retained so Jeryl simply adds a gradient filter in Lightroom to bring down the exposure of the sky. This in turn brings out the colors and details. He also brought down highlights and increased shadows to enhance the details of the cloud movement. Lastly, Jeryl says to remember to enable lens correction to your image, as that helps to remove vignetting.

2 DO NOT BE AFRAID TO UNDEREXPOSE YOUR SHOT.
In certain scenarios, you’ll want to shoot an underexposed long exposure image. For example, to capture the colors splashed across the sky during sunrise/sunset, and the cloud movement. This method allows you to get that dramatic effect and mood, without losing any details in the foreground even though the original image may look close to pitch black. This is very important as the sky may be completely blown out, or overexposed beyond recovery if you expose the image normally.


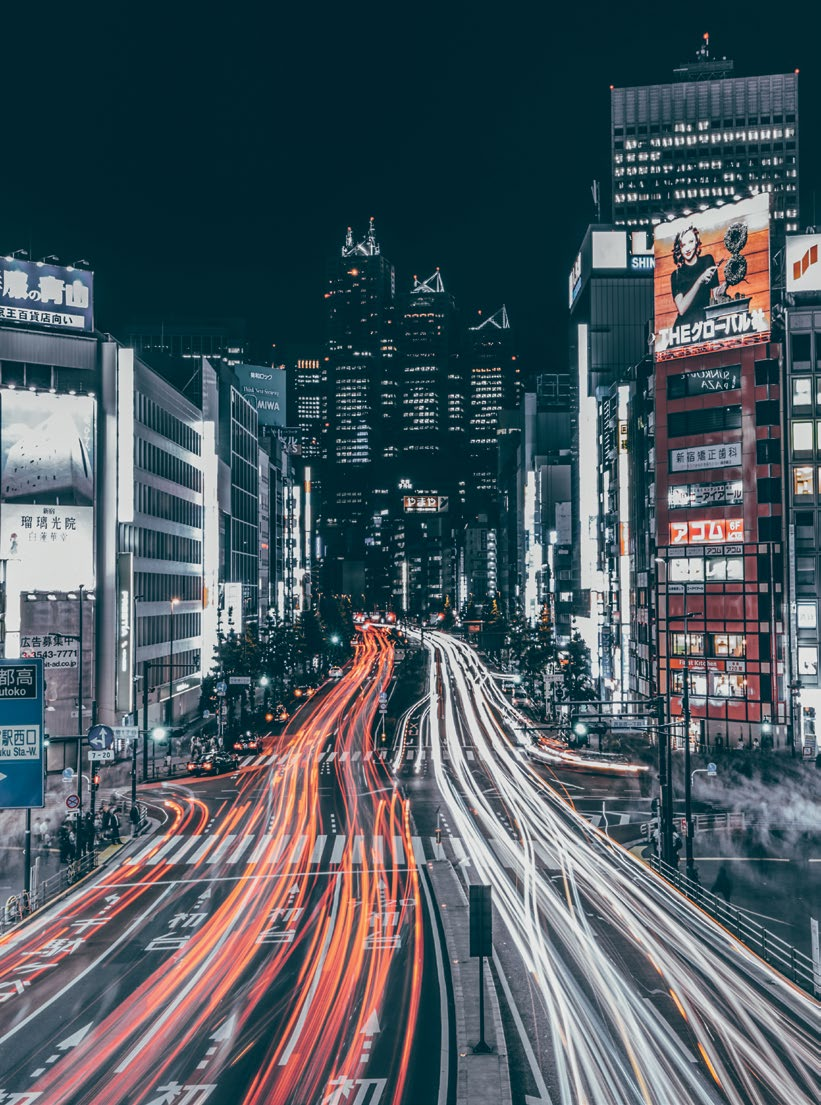
3 LONG EXPOSURE CAN BE DONE AT ANY TIME OF THE DAY.
In the day, the use of long exposure creates a motion blur effect on any movement; in this case, human traffic. This is completely different from motion blur created at night as objects are more visible during the day and almost every movement that reflects light can be captured.
At night, the use of long exposure allows you to capture any moving object with lights as light trails. This can be seen on highways, especially during periods of heavy traffic when there’s a lot of cars and movement.
There are other effects that long exposures can produce. This particular technique is called panning, and is particularly useful for keeping moving objects in focus. Focus on a moving object and capture it with a slower shutter speed (usually 1/10 of a second) by manually following its movements with your camera. You’ll get a blurredout background created by the surrounding lights which keeps the viewer’s attention on the main object.
Lastly, let your imagination run wild to with some creative photography art. Just use the flashlight mode of your mobile phone to “paint” in the dark while the camera is making an exposure, and you’ll get a light painting and a shot that’s unique to you!
PHOTOGRAPHY BY JERYL TAN EDITED BY MARCUS WONG JANUARY


