

You may think Kaby Lake isn’t that compelling an upgrade over Skylake, but the new roster of Intel Z270 motherboards could make you think again.

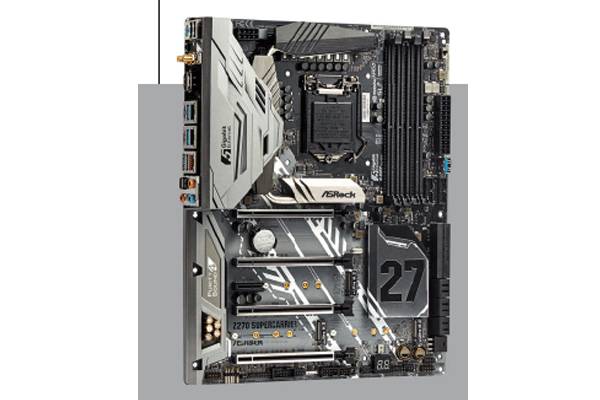


ASRock’s Supercarrier motherboard is perhaps a too-literal interpretation of the term “flagship”, but we mean that in a good way. It is packed with nearly every imaginable feature and then some, but it does so at a very competitive price that will give its rivals a serious run for their money.
For starters, it comes with a ton of storage and connectivity options, including 10 SATA 6Gbps ports (although only six are provided natively through the chipset), three M.2 sockets, and Wi-Fi connectivity.
There are no U.2 ports, but there aren’t many drives that use them anyway, and you can add some via M.2 adapter cards if you really need the interface.
ASRock has even thrown in not one, but two Thunderbolt 3 ports, so you’ll be able to take advantage of the latest devices that support the standard.
In addition, it has four metal-reinforced PCIe 3.0 x16 slots and support for up to 4-way SLI/Crossfire, courtesy of a PLX PEX 8747 PCIe lane switcher.
This is a feature usually found on more premium motherboards, and the Gigabyte Aorus Z270X Gaming 9 is the only other board here to have it, and it costs a good $200 more.
That said, we can’t help but wonder if this is an unnecessary feature that just serves to drive costs up. Users gunning for the Z270 platform probably won’t be looking at 4-way setups, and NVIDIA has even limited SLI to just two cards on its Pascal GPUs.
Another standout feature is the use of the Aquantia AQC108 5Gbps network controller which supports up to five times the throughput of regular Ethernet ports. On top of that, you get dual Gigabit Ethernet ports that support teaming, so this is one of the most fully-featured boards when it comes to network connectivity.
To appeal to overclockers, it is equipped with a 14-phase power design and dual BIOS to easily recover from failed overclocks. And of course, there’s the onboard RGB lighting, which takes the form of three discrete zones and a dedicated RGB lighting strip header that will allow you to add a dash of pizzazz to your build.

The ASUS ROG Maximus IX Formula is a board that stands out immediately because of its good looks. Exposed PCB?
No, this is a board covered with a stealthy armor plating of sorts.
Fortunately, there’s substance behind its outward appeal, bristling with a wide array of connectivity options and overclocking-oriented features.
It utilizes an 8-phase power design, with an additional two phases dedicated to the GPU and another two for the DRAM.
While that may not appear to be the most impressive configuration here, our overclocking results show that the quality of implementation matters more than the number of phases.
ASUS intended for this board to be used in a variety of high-end setups, including those featuring custom liquidcooling loops. The built-in CrossChill EK II VRM block sits between the heatsinks, and the pair of G1/4-inch ports will work with most liquid-cooling fittings.
To further cater to the performance crowd, the board also boasts things like a dedicated AIO pump header, dual CPU fan headers for high-end air-coolers, and even a high amp fan header.
Clearly, ASUS wanted to make the installation process as convenient as possible, and that’s carried over into details like giving all fan headers automatic PWM/DC detection.
There are also value-added features like a USB 3.1 (Gen 2) front header for 10Gbps transfer speeds via compatible ports at the front of the chassis. While not too common a feature yet, think of it as future-proofing.
The PCIe slots have been reinforced with metal and extra soldering points to withstand the weight of heavy GPUs like the slew of 2.5-slot custom NVIDIA GeForce GTX 1080 Tis. There is only support for up to 2-way SLI/3-way CrossFire, with no PCIe lane switcher for 4-way setups.

As far as flagship boards go, the Gigabyte Aorus Z270X Gaming 9 is crammed with just about any feature you need, and then some. Gigabyte has cranked the knob up to 11 in all the key areas such as storage connectivity, networking, and overclocking. The result however, is a prohibitive price tag.
It boasts a whopping 22-phase voltage regulator for high overclocks, but we should note that we had to set the CPU Vcore load-line calibration to Extreme in order to get the most out of it.
There’s support for up to 4-way SLI/ CrossFire as well, courtesy of a PEX 8747 lane switcher. However, as with the ASRock board, this is more a nice-tohave feature rather than a truly useful one, as four-card setups are rare.
In addition, you get eight SATA 6Gbps connectors, two M.2 sockets, and two U.2 ports. The latter an above-andbeyond inclusion on Gigabyte’s part, as most boards don’t even have one U.2 port. That said, it looks like Gigabyte clearly wanted to cover all the bases.
However, there’s a complicated web of bandwidth sharing among all these ports, so you won’t be able to populate them all at once.
On the networking front, the motherboard packs three Killer Network controllers – two Killer E2500 Gigabit Ethernet and one Killer Wireless-AC 1535 – that work together to prioritize and assign the most demanding data packets to the lowest latency connection.
The audio solution is fairly impressive as well, comprising a Creative Sound Blaster ZxRi chip, three upgradeable op-amps, and even a pair of gain switches for headphones with different impedances.
One particularly useful feature is the two LED panels that, other than showing you the debug codes, can be programmed to display status readings such as CPU temperature.

MSI’s Titanium series of motherboards have been quite a refreshing departure from the staid black of its competitors, and the Z270 XPower Gaming Titanium is no different.
It also retains the series’ traditional focus on overclocking and even comes with a dedicated OC Dashboard panel with useful hardware buttons for adjusting the BCLK or CPU clock ratio that you can mount on the motherboard or outside your case.
The board starts things off with a 16-phase power design, with 10 phases dedicated to the CPU alone. As it turns out, this was the only board here that matched the ASUS ROG Maximus IX Formula in terms of overclocking prowess.
For those chasing after extreme overclocks, there’s an additional 4-pin CPU header to supplement the power supplied by the standard 8-pin header.
They can also avail themselves of voltage readout points at the top right for closer monitoring.
Storage connectivity hasn’t been neglected, and the board boasts a good mix comprising eight SATA 6Gbps, three M.2 sockets, and a single U.2 port. There are no SATA Express ports, but you’re not likely to miss them.
One of the M.2 sockets also comes with something MSI calls M.2 Shield, a new protective shielding that aims to prevent M.2 drives from overheating.
This is located between the second and third PCIe slots, so the drive will remain accessible even with two cards.
You’ll find a total of four PCIe 3.0 x16 slots here, but there’s only support for up to 2-way SLI and 4-way CrossFire. That said, we had some issues installing a GPU into the first slot when a large cooler like the Cooler Master MasterAir Maker 8 was installed, so you’ll probably want to double check the measurements before going for extra large air coolers.


