

The streaming revolution may be upon us, but for the diehard audiophile, nothing beats procuring your own high-quality files.


The streaming revolution may be upon us, but for the diehard audiophile, nothing beats procuring your own high-quality files.

If there’s one thing Spotify doesn’t offer, it’s CD-quality sound. Sure, you could go to Tidal for that, but if you’re looking to stream high-resolution audio, you’ll pretty much be left out in the cold. Perhaps you’re not even that much of a stickler for sound quality and just have an entire hard drive of songs you don’t quite know what to do with. Either way, you’ll need a dedicated music player to organize your music library. And no, we don’t mean some new-fangled version of Windows Media Player.
For this, we return to a classic. Foobar2000 has been a staple media player and manager for Windows since the early 2000s, and it’s still one of the better ones out there to keep your precious garden of tunes well-tended. It’s a bit plain at first sight, but offers rich customization options and supports a wide range of add-ons for extra features.

MAKE IT YOURS
Installing add-ons is simple. Foobar2000’s official download page has a section dedicated to all the components you can grab to customize your listening experience. These are downloaded in the form of a .dll file. To enable them, simply drag the file into the Components folder in the installation directory, and you’re all set. Unless otherwise stated, all the add-ons we talk about here can be found on the main website and enabled in this manner.
You’ll also need to navigate to the View menu, hover over the Layout button, and then enable layout editing mode before you begin.
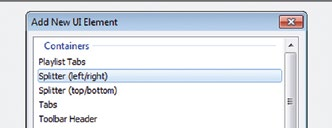
Next, click on “create a scratchbox” in the same sub-menu to start setting up your own custom layout. This calls up a blank window pane in which you can add UI elements of your choosing. Simply click anywhere within the window to bring up the UI control panel, and select one of the splitter options. The left/right one will create a vertical divider, while the top/bottom one will create a horizontal one.
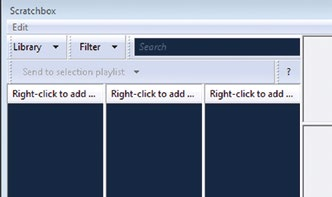
You can opt for a single left/right splitter and two top/bottom ones to create a unified left column and three other panes for displaying your music library, album cover flow, and some neat visualizations.
ORGANIZE, ORGANIZE, ORGANIZE
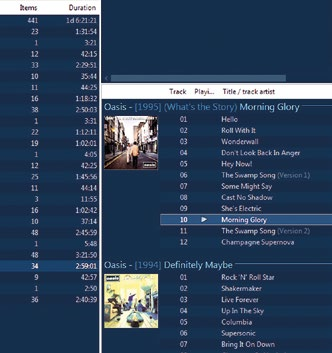
You’ll want to grab an add-on component called Facets to help you organize your music. In the scratchbox, click on the leftmost pane to bring up the “Add New UI Element” window again. Next, select Facets from under Media Library Viewers to add it.
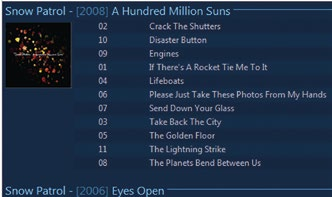
From this point on, it’s a simple matter of adding or removing columns and selecting what you would like them to display from dropdown menus. We suggest just sticking to a single pane and setting it to display just the artist name, so when you select one artist, all their albums will appear in the playlist window that we’re going to set up next.
This component is called SimPlaylist, and it will display your current playlist neatly according to albums, complete with thumbnails of the album covers.
DISPLAY ALBUM ARTWORK
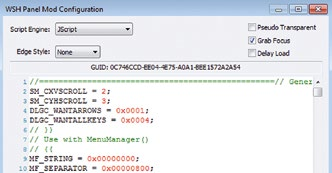
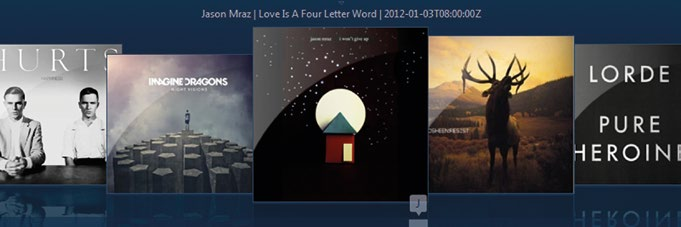
An add-on called WSH panel mod and script (WSH CoverFlow) will let you add an album cover flow to your interface, and also serves as a more intuitive way to select individual albums.
Note: This isn’t available on the Foobar2000 website, but a simple Google search will throw up the right download link.
The album cover flow goes in the topmost pane, after which you’ll be prompted to open the WSH Panel Mod Configuration and paste in the script included in a text file in the original download. The covers are organized alphabetically, and a nifty slider at the bottom shows your position in the alphabet, a great help when you’re scrolling through covers of your huge music library.
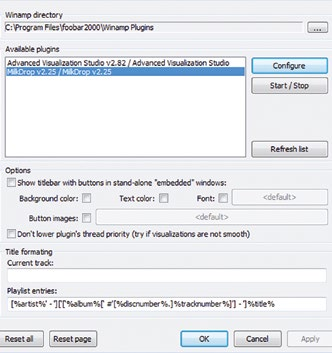
ADD SOME VISUALIZATIONS
Finally, you can spruce up the interface with a visualization pane at the bottom of the window. Foobar2000 already has some built-in options like a spectrogram or peak meter, but these can be found a little wanting as they’re more concerned with displaying technical information graphically than anything else.
An alternative is Shpeck, which lets you run the array of Winamp visualization plug-ins without needing to install Winamp itself. We’ll use a plug-in called MilkDrop as an example, but you’re free to use whatever catches your eye.
After setting the bottom pane to run Shpeck, navigate to the Preferences window and look under Visualisations for the Shpeck settings. All that’s left is to specify a Winamp directory from which it will grab the plug-ins – this folder can be located anywhere, although it’s probably simpler to put it in your Foobar2000 folder – and then select MilkDrop to enable it.


