

Get control of the tasks, projects and goals in your life. by Alvin Soon


Get control of the tasks, projects and goals in your life. by Alvin Soon
Last month, we covered how to start with sync, actions and projects in OmniFocus 2. For part two of this guide, we’re going to look at how we can use locations and dates to organize our actions.
GETTING STARTED WITH CONTEXTS
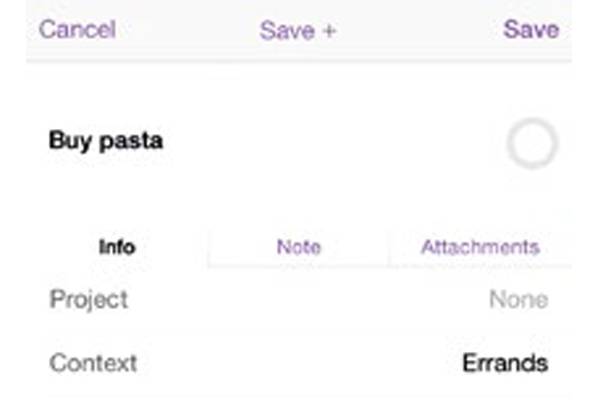
Projects are one way to organize actions in OmniFocus, and Contexts are another. Simply put, a Context is whatever that is needed in order to complete an action. That can mean a place, a thing or a person.
Where projects let you see all the steps you need to take to accomplish a goal, contexts let you see what you need to see, when you need to see it. Projects and Contexts aren’t exclusive. An action can have both a Project and a Context (but only one of each, an action cannot have multiple projects or contexts).
So, for example, you can give the actions that you can only complete at home a ‘Home’ context, and the actions that you can only complete in the office an ‘Office’ context.
You can begin to see why Contexts are so powerful. When you’re in the office, you don’t need to see actions that are meant for home. When you view by Context, you’ll only see what actions you have remaining for where you are in the moment.
To start using Contexts, you can start with OmniFocus’ default contexts. When you make a new action, choose which Context you want to add, below the Projects field.
Editing OmniFocus’ default contexts
There are a few ways to edit OmniFocus’ default contexts. To add a new Context of your own:
1. On the Home screen, tap ‘Contexts.’

2. Tap the ‘+@@@’ symbol on the top right.
3. Type in the name of your new Context.
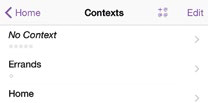
To edit the name of an existing context
1. On the Home screen, tap ‘Contexts.’
2. Tap the name of the Context you want to change.
3. Tap the name again.
4. In the context’s Settings page, tap its name again to bring up the keyboard, and edit its name.
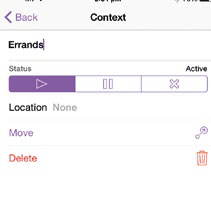
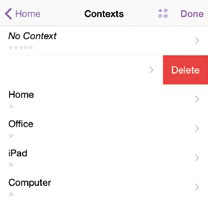
To delete existing Contexts, and sub-contexts, using the ‘Delete’ command
1. On the Home screen, tap ‘Contexts.’
2. Swipe left on the Context you want to delete.
3. Tap on the ‘Delete’ command that appears.
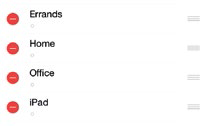
Delete Contexts, or rearrange them, using the ‘Edit’ command
1. On the Home screen, tap ‘Contexts.’
2. Tap ‘Edit’ on the top right.
3. Tap on the red circles with a ‘-’ sign next to the Context you want to delete.
4. Drag the ‘hamburger’ symbol (the three horizontal lines) to rearrange the Contexts’ order.
Adding actions in Contexts
1. On the Home screen, tap ‘Contexts.’
2. Tap the Context you want to add a new action in.
3. Tap the ‘+’ sign on the top right.
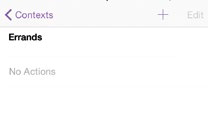
4. Select ‘New Action.’
5. Type in your new action.
How specific should contexts be?
Some people use extremely granular contexts: they have one for ‘Office,’ and under that they have ‘PC,’ ‘Phone,’ ‘Meeting,’ and so on. I’ve heard of people using a dedicated shop for a Context, like ‘the supermarket near my house.’
So how detailed should your contexts be? It all depends on you. My contexts aren’t so specific, instead of ‘Supermarket,’ for example; I use a catch-all ‘Shopping’ context. One way to find out how many you need is to use the fewest you can get away with, until you really need to add more.
GETTING STARTED WITH DUE DATES
Dates are another way you can manage your day-to-day actions. There are two kinds of dates you can set, Due Dates and Deferred Dates. We’ll start with Due Dates; which are simply times when the actions are due.
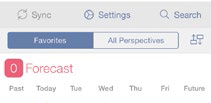
When you set a due date for an action; say, the 1st of October 5pm, that action will show up in the Forecast view as due, on the 1st of October.
To set a Due Date
1. Tap on the action on which you want to set a Due Date.
2. In the action’s Settings page, tap ‘Due’.
3. Choose the action’s due date and time.
Get notified on Due Dates
You can also set up OmniFocus notifications, so you get a number badge on the OmniFocus icon with the number of actions due that day, as well as reminders when actions have reached their due time and not been completed. If, during setup, you chose not to get notifications, here’s how you can get them.
1. Pull down on the Home screen to access the Menu.
2. Tap on ‘Settings.’
3. Scroll down to find, and tap on ‘Sounds, Alerts, and Badges.’
4. Tap ‘Allow Notifications.’
5. When iOS asks if you want OmniFocus to send you notifications, tap ‘OK.’
6. OmniFocus will now show badge counts for actions which are due soon and overdue.
How to set closer notifications
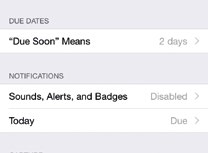
I find OmniFocus’ default setting of 2 days for actions that are ‘Due Soon’ to be too far in advance; I only want to see what’s really due soon in the immediate future. To change this:
1. Pull down on the Home screen to access the Menu.
2. Tap on ‘Settings.’
3. Scroll down to find, and tap on ‘“Due Soon” Means.’
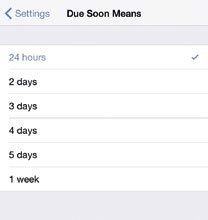
4. Change how far in advance you’d like ‘due soon’ to mean (mine is set to ‘24 hours’).
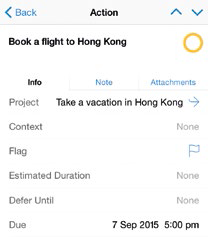
Due Dates are a good way to handle time-sensitive actions, which must be completed on a given date. They can also be a way to help you move projects forward; for example, I can set a Due Date for today to book a flight to Hong Kong, and a Due Date for tomorrow to book a hotel. Setting Due Dates this way helps me to make sure I act on my actions as the week goes on.
GETTING STARTED WITH DEFERRED DATES
Deferred Dates are the other way to handle time-sensitive dates in OmniFocus. Whereas Due Dates let you set a time when an action has to be completed, Deferred Dates let you put off actions until when they can be acted on.
For example, I can set an action now to “Buy a Christmas present for Tom,” and defer the action until the 1st of December. When I do that, the action disappears from my default view, and only reappears until on the 1st of December.
Why is this useful? In the GTD system, it’s only useful to see your available actions when you can actually act on them. To see actions for buying Christmas presents in September, when I don’t want to act on them now, is a waste of time and attention. So Deferred Dates are a way for you to put presently irrelevant actions out of sight and out of mind, until when you can do them.
To set a Deferred Date
1. Tap on the action on which you want to set a Deferred Date.
2. In the action’s Settings page, tap ‘Defer Until’.

3. Choose the action’s deferred date and time.
Using both Deferred and Due Dates You can use both Deferred and Due Dates for a single action. Let’s say I want to ask Brenda about where to visit in Hong Kong, but I’ll only be meeting her next Monday for lunch. So I’ll defer the action to next Monday at 12pm, and set its Due Date for Monday at 1pm.
Tip: How to see deferred actions

By default, deferred actions are shown as grayed-out items. To hide them:
1. Pull down on the screen in any page other than the Home page (for example, on the Projects screen).
2. Tap on ‘View’
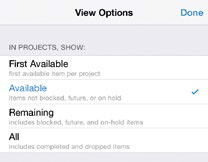
3. By default, OmniFocus shows all ‘Remaining’ items, which includes actions and projects that are blocked, in the future (deferred) and which have been put on hold.
4. Tap on ‘Available’ to only show items that are available to act on now.
5. Actions and projects that have been deferred should now be hidden from view.
To see a list of all your actions again, including your deferred actions:
1. Pull down on the screen in any page other than the Home page (for example, on the Projects screen).
2. Tap on ‘View’
3. Select ‘Remaining,’ which will show you both active and deferred actions
4. Tap ‘Done.’


