

Shooting weddings can be one of the most stressful assignments a photographer can get. Here are some tips from photographer Bryan Foong to get the best out of the images you capture.


This image was taken in New Zealand right about sunrise.
Bryan carefully controlled the exposure to make sure that the highlights would not be overexposed, and to allow enough details and light to come through in the shadows, so that he could enhance them later in Lightroom.
While editing in Lightroom, Bryan also adjusted the white balance, contrast and exposure to bring out the warm tones of the sunrise. (It was actually a really cold autumn morning.)
He further enhanced the blues and orange via the Hue Saturation Luminance (HSL) slider, adjusting the blue hue to bring out a slightly richer tone in the sky, and lowering the luminance to achieve a more dramatic background.
As the subjects’ skin tone shared the same orange tone as sunrise, Bryan made minor adjustments to get the skin tone to what he wanted, and thereafter used the adjustment brush to bring out more saturation and vibrance in the sunrise at the top-left-hand corner.
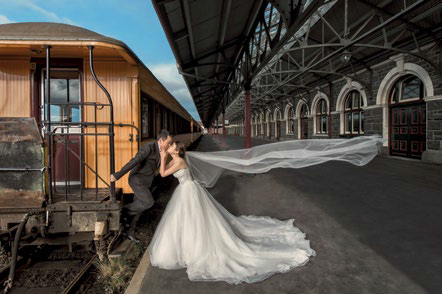
THE BIG CLEAN UP
To avoid the crowds, Bryan and the couple arrived at the train station way before the earliest boarding time. He placed the couple at the end of the train where they would get natural light at the highest intensity, letting him achieve an exposure where the couple would be properly lit up without overexposing the blue sky. Knowing that his camera had good shadow recovery capabilities, Bryan shot at a low ISO setting with the intention of brightening the shadowed area at the back of the image in Lightroom.
He also adjusted the whites in Lightroom to achieve a soft, glowing look on the wedding gown.
Moving on to Photoshop, Bryan then made use of content aware fill to remove the small crowd at the back as well as the many distracting elements – such as the cross at the front of the train, the yellow line, and spots on the ground.

MODERN MINIMALIST IMAGE
This next image was shot one evening in Singapore.
Bryan made use of the strong sunlight to create a nice light rim separating the couple from the background. He chose a higher perspective for this location to achieve a clean minimalist look, and at the same time, made use of the natural lines and curves to create an interesting, modern image.
In Lightroom, Bryan adjusted the curves to further accentuate the whites and blacks for a cleaner high-key look.

SKIN TONE AND RETOUCHING
Bryan placed the bride near a natural light source to achieve a soft glow on her face.
In Lightroom, Bryan adjusted the white balance to show what the natural light and colors looked like that morning. He also adjusted the bride’s skin tone using the HSL sliders on the reds and orange.
Moving to Photoshop, Bryan used the spot healing tool to remove the slight blemishes on the subject’s skin, and also made use of frequency separation to even out the skin tone and slightly smoothen the skin. This technique creates two layers – one layer for the adjustment of the color and another layer for adjustment of details. The color layer helps even out the skin tone, while the details layer helps to smoothen out the skin.

SHOOTING INTO THE LIGHT
This image was taken in summer at a desert in Nevada.
Bryan waited until the moment right before the sun set into the horizon. At this time, there was still enough ambient light to light the couple. Bryan had to control the amount of light entering the lens by strategically placing the sun between the roof of the car and the couples’ heads. If more light entered his lens, he would have gotten unwanted are in his image and would lose the contrast he wanted.
In Lightroom, he used the vignette tool to darken the edges of the image, drawing attention to the couple. The vignette used had high feathering set so that it would appear more gradual and natural. Bryan says the key is not to create a dark outline on the image but a subtle look to enhance the mood.


